Target
- daemonsets
- deployment
- statefulsets


Policy
- request cpu 單位以十進位設定
  - 像是 50m 100m 200m 250m 500m 1000m(or 1)
- request memory 單位以二進位設定
  - 像是 16Mi 32Mi 64Mi 128Mi 256Mi 384Mi 512Mi 768Mi 1024Mi(or 1Gi)
- request memory 是 node 實際上能放進 pod 的基本量, pod 塞不進 pod 就得生出新的 node 來放.
- pod cpu 吃到超過 limit cpu, 會被卡住等下一輪資源繼續跑, 不會被砍掉.
- pod memory 吃到超過 limit memory, 會被 OOM 機制砍掉.
- request cpu 太小的話, 有可能 schedule job 耗用的 cpu 反而比較高, 造成效率變差.
- limit memory 至少是 request memory 的一倍大, 才不會被塞進剩餘空間太小的 node 然後 OOM 被宰.
- nodejs 可能有 memory leak 狀況, memory 可能會越吃越多(無法被 gc), 最後被 OOM 砍掉.
- nodejs memory leak 越嚴重, cpu 耗用越高, 有可能卡到 limit cpu 導致卡卡的慢.
- java / nodejs 服務啟動時可能會吃大量 memory, 然後才 gc 放掉, limit memory 就得觀察後再提高.


Cloud Features
- AWS
  - node instance type 用 t 系列可以 cpu burst (use credit or $$), 必要的時候 limit cpu 可以拉很高來用.
- GCP
  - request minimum
    - cpu 50m
    - memory 52Mi
  - resources cpu:memory 比例有最大上限 1:6.5
- Azure
  - TBD


Azure
- cpu
  - request 要看服務是用什麼服務/架構寫的, 太少的話可能 pod 不會在 1 分鐘內 ready, 像是 java.
  - limit 要觀察服務量有多大而設定, 或是服務本身的機制耗用 cpu 高的話, limit 也拉高備用.
  - go
    - request
      - 50m
    - limit
      - 200m or more
  - nodejs / typescript
    - request
      - 100m
      - or more for pod ready in 1min
      - or less for low cpu resource use after startup
    - limit
      - 500m
  - java / kotlin / scala
    - request
      - 200m
      - or more for pod ready in 1min
      - or less for low cpu resource use after startup
    - limit
      - 1
      - 還是有可能 1 分鐘內 pod 沒來得及 ready, 得調整 deployment 加長 ready 偵測時間
        - spec.template.spec.containers.livenessProbe.initialDelaySeconds: 60
        - spec.template.spec.containers.readinessProbe.initialDelaySeconds: 60

- memory
  - request 通常會設定為比目前用量小一階的基本量.
  - limit 則是會設定為比目前用量大一階, 得花些時間觀察狀況持續更新.


% kubectl top pod | grep foobar-deploy
foobar-deploy-8487bddd77-cl5br                                  18m          365Mi
foobar-deploy-8487bddd77-pmpm4                                  43m          343Mi
foobar-deploy-8487bddd77-sfdtc                                  19m          299Mi
foobar-deploy-8487bddd77-sl5s9                                  21m          605Mi
foobar-deploy-8487bddd77-sr5kc                                  21m          618Mi

  - request
    - 256Mi
  - limit
    - 768Mi


% kubectl top pod | grep blahblah-deploy
blahblah-deploy-6fc6dd8c97-5txhc                           25m          263Mi
blahblah-deploy-6fc6dd8c97-7s8jb                           26m          287Mi
blahblah-deploy-6fc6dd8c97-9dc4z                           25m          199Mi
blahblah-deploy-6fc6dd8c97-bc7kf                           26m          330Mi
blahblah-deploy-6fc6dd8c97-bqwwf                           26m          329Mi
blahblah-deploy-6fc6dd8c97-dgj22                           24m          283Mi
blahblah-deploy-6fc6dd8c97-gjftr                           26m          260Mi
blahblah-deploy-6fc6dd8c97-kgmf4                           24m          279Mi
blahblah-deploy-6fc6dd8c97-nl667                           25m          217Mi
blahblah-deploy-6fc6dd8c97-nqbqb                           28m          266Mi
blahblah-deploy-6fc6dd8c97-pjfs9                           33m          220Mi
blahblah-deploy-6fc6dd8c97-qbslb                           26m          527Mi
blahblah-deploy-6fc6dd8c97-sf4hc                           38m          261Mi
blahblah-deploy-6fc6dd8c97-tn5ch                           27m          392Mi
blahblah-deploy-6fc6dd8c97-wg2qs                           25m          258Mi

  - request
    - 128Mi
  - limit
    - 512Mi or 768Mi
    - 因為 pod 數量夠多, 所以少數超過 512Mi 的情況可以接受設定 512Mi 被 OOM 砍掉換人做.
    - 但如果是一次處理大量資料的 pod, 就不能發生被中途砍掉的狀況, 得設定 768Mi 甚至更多.
2025年3月10日 星期一
Kubernetes - tuning containers resources requests and limits

2022年11月30日 星期三
GCP - copy IAM custom role R from project A to project B
Role ID: projects/A/roles/R

0. gcloud auth login (with enough permission)

1. gcloud iam roles describe R --project=A > R.txt

2. gcloud iam roles create R --project=B --file=R.txt
2021年12月2日 星期四
GCP - Cloud CDN for external site
Scenario
https://www.foobar.com - external site, not in Google Cloud.Requirement
set another hostname for origin server access - for example, web.foobar.com ip = www.foobar.com ipSteps
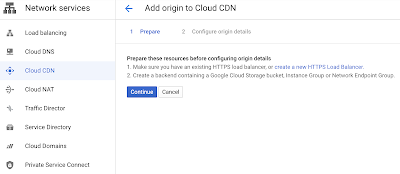
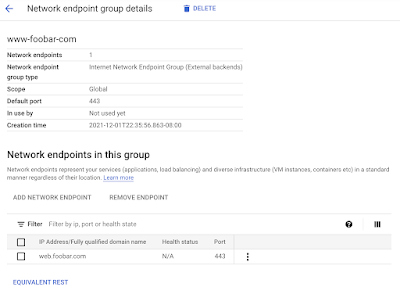
0. In the beginning of Cloud CDN, click "ADD ORIGIN".1. After reading preparation, and click "Continue".2. www.foobar.com is an external site, so check "Use an external backend".3. Click "Load balancer" list, and click "Create a load balancer".4. In "New Classic HTTP(S) load balancer" form, start at Backend configuration.5. Click "Backend services & backend buckets" list, and click "CREATE A BACKEND SERVICE".6. In "Create backend service" form, basic area.7. In "Create backend service" form, "Backends" area.8. In "Create backend service" form, "Cloud CDN" area.9. In basic area, input "Name" and "Description", "Backend type" select "Internet network endpoint group / External backends".10. After selecting "Backend type", "Protocol" select "HTTPS".11. In "Backends" area, click "Internet network endpoint group" list, and click "CREATE INTERNET NETWORK ENDPOINT GROUP".12. In "Create a network endpoint group" form.13. Input "Name", "Network endpoint group type" select "Network endpoint group (Internet)", "Default port" input "443", "Fully qualified domain name" input "web.foobar.com", and click "Create".14. After clicking "Create", "www-foobar-com" in the Network endpoint group list.15. "Network endpoint group details" of "www-foobar-com".16. Back to the "Backends" area, input "foobar" at "Filter" and shows "www-foobar-com", click it.17. After clicking "www-foobar-com", it showed at "Internet network endpoint group".18. In "Cloud CDN" form, check "Enable Cloud CDN" and change default settings, then click "CREATE".19. After creating "Backend configuration" successful, back to "New Classic HTTP(S) load balancer" form. Check "www-foobar-com" in "Backend services & backend buckets" list, then click "OK".
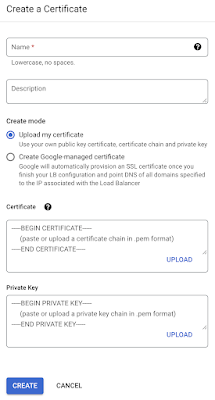
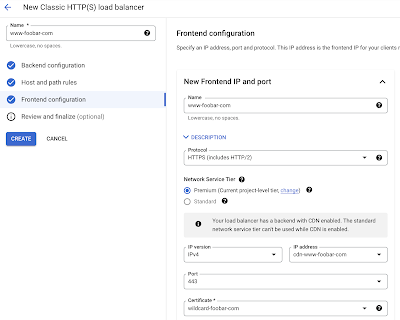
20. After clicking "OK", "www-foobar-com" is listed below.21. Skip "Host and path rules" form, because of using CDN to cache whole site.22. In "New Classic HTTP(S) load balancer" form, "Frontend configuration" area.23. Input "Name", "Protocol" select "HTTPS (include HTTP/2)", shows "Certificate" list below, cilck "CREATE A NEW CERTIFICATE".24. In "Create a Certificate" form.25. Input "Name", check "Create Google-managed certificate", input "Domains" then click "CREATE".26. Back to "Frontend configuration" form. Click "IP address" list, and click "CREATE IP ADDRESS”.27. In "Reserved a new static IP address" form. Input "Name", and click "RESERVE".28. Back to "Frontend configuration" form.29. In the bottom of "Frontend configuration" form, click "ADDITIONAL CERTIFICATES" to expand form. Check "Enable HTTP to HTTPS redirect”, and click “DONE”.30. Complete "Frontend configuration" form.31. Click "Review and finalize" to confirm, and click “CREATE”.32. There are two new load balancers. "HTTPS" is for supporting service, and "HTTP" is for redirecting connections to "HTTPS".33. Reload "Cloud CDN", there is a new CDN listed. Click "www-foobar-com" under "Associated load balancers".34. IP:Port of www-foobar-com is detailed. Set this IP address to www.foobar.com in DNS service.
Remove CDN settings: 1. Network services - Cloud CDN 2. Network services - Load balancing (remove with backend and certification) 3. VPC Network - IP addresses









2021年10月18日 星期一
Terraform - googleapi: Error 409: The Cloud SQL instance already exists
今天改了 db 的 resource dependency 要整個砍掉重練看看是不是一鍵順暢建庫成功, 所以先跑了 terraform destroy (要先關掉 db instance 的 deletion protection)再跑 terraform apply 開始蓋, 結果...
googleapi: Error 409: The Cloud SQL instance already exists.

When you delete an instance, you can't reuse the name of the deleted instance until one week from the deletion date.,
instanceAlreadyExists
我以為這種鳥蛋限制只會在 Azure 上面出現.... <囧>
這年頭連 GCP 都要做誤刪資料庫甚至刪庫跑路的災難回復服務了?
這還不是最鳥的問題, 而是用 terraform apply 進行 create sql instance 等了超過 20 分鐘, 才噴這個訊息出來, 這種 instance name check 應該放在最前面檢查吧....!@#$
2021年10月4日 星期一
Terraform - the only supported value for workload pool is ...
昨天 terraform 能正常跑完, 今天換了個 project 卻噴出這個訊息:
Error: googleapi: Error 400: Currently, the only supported value for workload pool is "foobar.svc.id.goog"., badRequest
terraform 這塊的設定檔也沒改, 是怎麼噴掉的?
打開 TF_LOG 開始追 API query 看了老半天, 覺得沒有問題啊, 再仔細看看... 嗯?
"workloadIdentityConfig": {
  "identityNamespace": " foobar.svc.id.goog"
}
怎麼 foobar 前面有個疑似空白的東西, 回去翻 terraform 設定.
這邊是抓 google_project.data.name 來用, 再切到 GCP portal IAM 看看...
Permissions for project " foobar"
project name 還真的前面有個空白存在... <囧>
後來在 console 的 IAM -> Settings 把 Project name 前面的空白拿掉, 存檔, 再跑一次 terraform 就正常了.
2021年6月21日 星期一
Terraform - GCP IAM apply / destroy race condition
這是一個用 terraform 處理 GCP project / pubsub subscription / pubsub topic / storage bucket / etc 的 IAM role 常會遇到的 race condition, 目前高達八成確定原因是在 GCP 的相關 API 不是 single action, 而是 atomic action, 而且設後不理沒確認是否執行完成就直接 return.
目前只能用 workaround 解法: 再執行/多執行幾次 terraform 指令. (原因後敘)
假設狀況如下: (真實狀況可能不是/不只這樣) - bucket foobar 原本就有 role: roles/storage.legacyBucketReader - 現在要改成 role: roles/storage.legacyBucketOwner - 執行 terraform apply (無關的部分就省略了):Terraform used the selected providers to generate the following execution plan. Resource actions are indicated with the following symbols: -/+ destroy and then create replacement Terraform will perform the following actions: # module.basement.google_storage_bucket_iam_member.bucket must be replaced -/+ resource "google_storage_bucket_iam_member" "bucket" { ~ role = "roles/storage.legacyBucketReader" -> "roles/storage.legacyBucketOwner" # forces replacement } Plan: 1 to add, 0 to change, 1 to destroy. Do you want to perform these actions? Terraform will perform the actions described above. Only 'yes' will be accepted to approve. Enter a value:表示這個 bucket 的 iam role 會被先拆後建. - 輸入 yes 再按 enter 下去之後, 噴錯誤訊息出來說無法設定之類的.... (省略) - 通常只要再執行一次 terraform apply 再 yes 下去之後就可以正常執行完. - 還是噴一樣錯誤訊息的話, 那就再等一下再執行一次... - The End.
有人會問, 是不是可以用 time_sleep 的寫法讓 destroy 先執行完再 apply ?
首先, 這是一個 resource 被 replace (destroy -> apply) 的動作, 並不是分開的 resource 運作, 所以不適用上面這種方式來處理.
其次, 在 terraform 裡面這應該是個呼叫 GCP API 進行 remove 之後再 add 的行為, 中間沒有也不應該有 delay 動作影響執行效率(這也可能產生別的 race condition), 問題點是在 remove 跟 add 大概是 atomic action, 沒有全部確定執行完就 return 回來, 產生後續的 race condition 問題.
最後, 利用 time_sleep 那個寫法實在是累贅也有問題, 因為使用者通常不會知道 create 要花多久時間(create_duration), 也不會知道 destroy_duration 多久, 只能用預估或是猜的來設定. 若是 GCP 不忙的時候可能 1s 就全部跑完, 卻還要等完剩下的 29s, 或是 1m 才跑完, 設定 30s 照樣還是發生 race condition.
倒不如還是人工 delay 再人工執行同樣的 terraform 指令還比較簡單實用.
2021年5月31日 星期一
GCP - Basic.Owner is not full Owner of project
一般來說, GCP project 使用者最大的權限應該是 Basic.Owner, 幾乎所有情況都能通行無阻.
但是...
最好再加上一個 Storage Admin 的 Owner, 才不會在 Cloud Storage 之類的相關功能遇到莫名其妙的卡住. 尤其是有用 terraform 操控 bucket + iam 的時候...
如果 project 上面還有一層 organization, 最好也設定個 Organization 的 Owner 上身, 避免靈異現象...
訂閱:
文章 (Atom)