2025年4月7日 星期一

Terraform - aws_eks_cluster 開始支援 auto mode 之後的雷

AWS EKS cluster 在 auto mode 出現之前, aws_eks_cluster 通常不會去設定這幾個選項, 預設如下:

  bootstrap_self_managed_addons = true

  access_config {
    authentication_mode                         = "CONFIG_MAP"
    bootstrap_cluster_creator_admin_permissions = false #1
  }

但是 auto mode 出現之後, 有用 auto mode 就需要這樣設定:

  bootstrap_self_managed_addons = false

  access_config {
    authentication_mode                         = "API_AND_CONFIG_MAP"
    bootstrap_cluster_creator_admin_permissions = false
  }

沒用 auto mode 就需要這樣設定:

  bootstrap_self_managed_addons = true

  access_config {
    authentication_mode                         = "CONFIG_MAP"
    bootstrap_cluster_creator_admin_permissions = true #2
  }

有發現 #1 跟 #2 設定值不同

在 auto mode 出現之前已經開起來的 EKS cluster 目前還沒出現明顯異常, 但是在 terraform 裡面還是會做成設定一致, 所以就來試著更動已存在的 EKS cluster 這個設定.

  # module.cellar.module.eks.module.cluster["foobar"].aws_eks_cluster.this must be replaced
  -/+ resource "aws_eks_cluster" "this" {
        ...

      ~ access_config {
          ~ bootstrap_cluster_creator_admin_permissions = false -> true # forces replacement
            # (1 unchanged attribute hidden)
        }

        ...
    }

乾~ 更動 bootstrap_cluster_creator_admin_permissions 的設定竟然要把 cluster 砍掉重練!

為了往後新的 EKS cluster 設定的正確性, 只好在 aws_eks_cluster 裡面放一段 lifecycle 讓已存在的 cluster 不受影響:

  lifecycle {
    ignore_changes = [
      access_config[0].bootstrap_cluster_creator_admin_permissions
    ]
  }

2025年3月10日 星期一

Kubernetes - tuning containers resources requests and limits

Target
- daemonsets
- deployment
- statefulsets


Policy
- request cpu 單位以十進位設定
  - 像是 50m 100m 200m 250m 500m 1000m(or 1)
- request memory 單位以二進位設定
  - 像是 16Mi 32Mi 64Mi 128Mi 256Mi 384Mi 512Mi 768Mi 1024Mi(or 1Gi)
- request memory 是 node 實際上能放進 pod 的基本量, pod 塞不進 pod 就得生出新的 node 來放.
- pod cpu 吃到超過 limit cpu, 會被卡住等下一輪資源繼續跑, 不會被砍掉.
- pod memory 吃到超過 limit memory, 會被 OOM 機制砍掉.
- request cpu 太小的話, 有可能 schedule job 耗用的 cpu 反而比較高, 造成效率變差.
- limit memory 至少是 request memory 的一倍大, 才不會被塞進剩餘空間太小的 node 然後 OOM 被宰.
- nodejs 可能有 memory leak 狀況, memory 可能會越吃越多(無法被 gc), 最後被 OOM 砍掉.
- nodejs memory leak 越嚴重, cpu 耗用越高, 有可能卡到 limit cpu 導致卡卡的慢.
- java / nodejs 服務啟動時可能會吃大量 memory, 然後才 gc 放掉, limit memory 就得觀察後再提高.


Cloud Features
- AWS
  - node instance type 用 t 系列可以 cpu burst (use credit or $$), 必要的時候 limit cpu 可以拉很高來用.
- GCP
  - request minimum
    - cpu 50m
    - memory 52Mi
  - resources cpu:memory 比例有最大上限 1:6.5
- Azure
  - TBD


Azure
- cpu
  - request 要看服務是用什麼服務/架構寫的, 太少的話可能 pod 不會在 1 分鐘內 ready, 像是 java.
  - limit 要觀察服務量有多大而設定, 或是服務本身的機制耗用 cpu 高的話, limit 也拉高備用.
  - go
    - request
      - 50m
    - limit
      - 200m or more
  - nodejs / typescript
    - request
      - 100m
      - or more for pod ready in 1min
      - or less for low cpu resource use after startup
    - limit
      - 500m
  - java / kotlin / scala
    - request
      - 200m
      - or more for pod ready in 1min
      - or less for low cpu resource use after startup
    - limit
      - 1
      - 還是有可能 1 分鐘內 pod 沒來得及 ready, 得調整 deployment 加長 ready 偵測時間
        - spec.template.spec.containers.livenessProbe.initialDelaySeconds: 60
        - spec.template.spec.containers.readinessProbe.initialDelaySeconds: 60

- memory
  - request 通常會設定為比目前用量小一階的基本量.
  - limit 則是會設定為比目前用量大一階, 得花些時間觀察狀況持續更新.

% kubectl top pod | grep foobar-deploy foobar-deploy-8487bddd77-cl5br 18m 365Mi foobar-deploy-8487bddd77-pmpm4 43m 343Mi foobar-deploy-8487bddd77-sfdtc 19m 299Mi foobar-deploy-8487bddd77-sl5s9 21m 605Mi foobar-deploy-8487bddd77-sr5kc 21m 618Mi
- request - 256Mi - limit - 768Mi
% kubectl top pod | grep blahblah-deploy blahblah-deploy-6fc6dd8c97-5txhc 25m 263Mi blahblah-deploy-6fc6dd8c97-7s8jb 26m 287Mi blahblah-deploy-6fc6dd8c97-9dc4z 25m 199Mi blahblah-deploy-6fc6dd8c97-bc7kf 26m 330Mi blahblah-deploy-6fc6dd8c97-bqwwf 26m 329Mi blahblah-deploy-6fc6dd8c97-dgj22 24m 283Mi blahblah-deploy-6fc6dd8c97-gjftr 26m 260Mi blahblah-deploy-6fc6dd8c97-kgmf4 24m 279Mi blahblah-deploy-6fc6dd8c97-nl667 25m 217Mi blahblah-deploy-6fc6dd8c97-nqbqb 28m 266Mi blahblah-deploy-6fc6dd8c97-pjfs9 33m 220Mi blahblah-deploy-6fc6dd8c97-qbslb 26m 527Mi blahblah-deploy-6fc6dd8c97-sf4hc 38m 261Mi blahblah-deploy-6fc6dd8c97-tn5ch 27m 392Mi blahblah-deploy-6fc6dd8c97-wg2qs 25m 258Mi
- request - 128Mi - limit - 512Mi or 768Mi - 因為 pod 數量夠多, 所以少數超過 512Mi 的情況可以接受設定 512Mi 被 OOM 砍掉換人做. - 但如果是一次處理大量資料的 pod, 就不能發生被中途砍掉的狀況, 得設定 768Mi 甚至更多.

2025年1月13日 星期一

Akamai - CDN access logs to Datadog

目的: 把 blah.foobar.com 的 CDN access log 轉送到 datadog 備查

0. Datadog
  - 設定設定
    - https://docs.datadoghq.com/integrations/akamai_datastream_2/

1. COMMON SERVICES - DataStream
  - 點選 Create stream - Delivery Products
    - CONFIGURATION
      - Display Name: blah-foobar-com-logs-to-datadog
      - Group: Foobar-W-DEADBF
      - Include properties: 勾選 blah.foobar.com
    - DATA SETS
      - Log information
        - (include all)
      - Message exchange data
        - (include all)
      - Request header data
        - (include all)
      - Network performance data
        - (include all)
      - Cache data
        - (include all)
      - Geo data
        - (include all)
      - Web security
        - (include all)
      - EdgeWorkers
        - (include all)
      - Content protection
        - (include all)
      - Custom fields
        - (include all)
      - Log file
        - Log format: Json
    - DELIVERY
      - Destination
        - Destination: 選 Datadog
        - Display name: blah-foobar-com-logs-to-datadog
        - Endpoint: (datadog input endpoint)
          - https://http-intake.logs.datadoghq.com/v1/input
          - https://http-intake.logs.datadoghq.eu/v1/input
        - Tags: source:akamai.datastream
        - Source: akamai.datastream
        - Service:
        - API Key: (datadog api key)
        - Send compressed data: No
      - Delivery options
        - Push frequency: 60 Seconds
    - SUMMARY
  - 幾個步驟建立完之後, blah-foobar-com-logs-to-datadog 的 status 是 Activating - V1
    - 只能 View / History / Clone, 無法 Edit / Deactivate / Delete
    - V1 是指這個 Stream 設定是 version 1, 不是 DataStream 1 的意思

2. CDN - Properties
  - 選 blah.foobar.com 再點選版本, 點 Edit New Version
  - 左邊選 Default Rule, 右邊點 +Behavior 新增 DataStream
    - Stream version 只有選 DataStream 2 會過
      - DataStream 1 要被淘汰掉
      - 選 DataStream 1 會跳出警告訊息, 可以 Save 但無法 Activate
    - Stream names 選 blah-foobar-com-logs-to-datadog
    - Sample rate 預設 100
      - 通靈用的話一定要選 100, 要不然缺 log 會讓你通到屎
  - 最後 Save
  - 然後 Activate 這個新版本上線
    - 最久 10 分鐘才會完成

3. 回到 COMMON SERVICES - DataStream
  - blah-foobar-com-logs-to-datadog 的 status 在 Properties 上完之後變成 Active - V1
    - 第一次比較快
    - Active 狀態才可以 Edit / Deactivate
      - 要 Delete 的話, 要先 Deactivate 讓狀態變成 Deactived 才能 Delete
    - 無論是 Edit / Deactivate, 最久 60 分鐘才會生效

2025年1月9日 星期四

Akamai - CDN access logs to S3 bucket

目的: 把 blah.foobar.com 的 CDN access log 轉送到 s3 bucket 備查

0. AWS S3
  - 開好 bucket
    - blah-foobar-com-logs @us-west-2
  - 建立完全存取這個 bucket 的 IAM User 
    - S3-blah-foobar-com-logs-ReadWrite
  - 在這個 IAM User 建立 access key pair

1. COMMON SERVICES - DataStream
  - 點選 Create stream - Delivery Products
    - CONFIGURATION
      - Display Name: blah-foobar-com-logs-to-s3
      - Group: Foobar-W-DEADBF
      - Include properties: 勾選 blah.foobar.com
    - DATA SETS
      - Log information
        - Request time
      - Message exchange data
        - Bytes
        - Client IP
        - HTTP status code
        - Protocol type
        - Request host
        - Request method
        - Request path
        - Request port
        - Response Content-Length
        - Response Content-Type
        - User-Agent
        - SSL overhead time
        - SSL version
        - Object size
        - Uncompressed size
        - Total bytes
        - Query string
      - Request header data
        - Cookie
        - Range
        - Referer
        - X-Forwarded-For
        - Max age
      - Network performance data
        - Error code
      - Cache data
        - (null)
      - Geo data
        - (null)
      - Web security
        - (null)
      - EdgeWorkers
        - (null)
      - Content protection
        - (null)
      - Custom fields
        - Custom field
      - Log file
        - Log format: Json
    - DELIVERY
      - Destination
        - Destination: 選 Amazon S3
        - Display name: blah-foobar-com-logs-to-s3
        - Bucket: blah-foobar-com-logs
        - Path: logs/{%Y}/{%m}/{%d}/{%H}
          - 檔案儲存結構用 年/月/日/小時 存放
          - 目前每小時約產生兩千多個小檔案, gzip -d 解開之後就是純文字檔案
        - Region: us-west-2
        - Access key ID: (bucket 的 IAM user 的 access key id)
        - Secret access key: (bucket 的 IAM user 的 secret access key)
      - Delivery options
        - Filename: ak -[random-string]-[epoch-timestamp]-[random-string]- ds
          - 中間這一段沒辦法改, 我比較想要 [epoch-timestamp] 在前面比較好用
        - Push frequency: 60 Seconds
    - SUMMARY
  - 幾個步驟建立完之後, blah-foobar-com-logs-to-s3 的 status 是 Activating - V1
    - 只能 View / History / Clone, 無法 Edit / Deactivate / Delete
    - V1 是指這個 Stream 設定是 version 1, 不是 DataStream 1 的意思

2. CDN - Properties
  - 選 blah.foobar.com 再點選版本, 點 Edit New Version
  - 左邊選 Default Rule, 右邊點 +Behavior 新增 DataStream
    - Stream version 只有選 DataStream 2 會過
      - DataStream 1 要被淘汰掉
      - 選 DataStream 1 會跳出警告訊息, 可以 Save 但無法 Activate
    - Stream names 選 blah-foobar-com-logs-to-s3
    - Sample rate 預設 100
      - 通靈用的話一定要選 100, 要不然缺 log 會讓你通到屎
  - 最後 Save
  - 然後 Activate 這個新版本上線
    - 最久 10 分鐘才會完成

3. 回到 COMMON SERVICES - DataStream
  - blah-foobar-com-logs-to-s3 的 status 在 Properties 上完之後變成 Active - V1
    - 第一次比較快
    - Active 狀態才可以 Edit / Deactivate
      - 要 Delete 的話, 要先 Deactivate 讓狀態變成 Deactived 才能 Delete
    - 無論是 Edit / Deactivate, 最久 60 分鐘才會生效

2024年6月6日 星期四

Terraform - aws_rds_proxy 接 RDS PostgreSQL 的 init_query 指令

在 Terraform 的文件 db_proxy_default_target_group 只有提供 MySQL 的使用範例:

resource "aws_db_proxy" "example" {
  name                   = "example"
  debug_logging          = false
  engine_family          = "MYSQL"
  idle_client_timeout    = 1800
  require_tls            = true
  role_arn               = aws_iam_role.example.arn
  vpc_security_group_ids = [aws_security_group.example.id]
  vpc_subnet_ids         = [aws_subnet.example.id]

  auth {
    auth_scheme = "SECRETS"
    description = "example"
    iam_auth    = "DISABLED"
    secret_arn  = aws_secretsmanager_secret.example.arn
  }

  tags = {
    Name = "example"
    Key  = "value"
  }
}

resource "aws_db_proxy_default_target_group" "example" {
  db_proxy_name = aws_db_proxy.example.name

  connection_pool_config {
    connection_borrow_timeout    = 120
    init_query                   = "SET x=1, y=2"
    max_connections_percent      = 100
    max_idle_connections_percent = 50
    session_pinning_filters      = ["EXCLUDE_VARIABLE_SETS"]
  }
}

這邊 init_query 是用 “SET x=1, y=2” 當作 proxy 連上 DB 的測通指令, 但是 MySQL 的 SET 指令跟 PostgreSQL 的 SET 指令用法不同, 所以直接把這個範例給 PostgreSQL 用的時候會噴錯誤:

proxy log:
- [INFO] [dbConnection=1140488035] The database connection closed. Reason: An internal error occurred.

DB log:
- ERROR: syntax error at or near "=" at character 11
- STATEMENT: SET x=1, y=2

(以上來自 CloudWatch Log Groups, DB 跟 DB proxy 都有設定送出 log 到這邊)

伸進去 PostgreSQL DB 手動執行指令看看:

postgres=> SET x=1, y=2;
ERROR:  syntax error at or near "="
LINE 1: SET x=1, y=2;
                  ^
postgres=> SET x=1;
ERROR:  unrecognized configuration parameter "x"
postgres=>

確認是 SET 指令造成錯誤.

Google 查了幾下也是有一些回報同樣的問題, 解法幾乎都是把 init_query 拿掉, 但是這樣就少了一個 proxy 連入 DB 後, 測通 DB 是否有正常反應的機制.

所以找個簡單的指令替代 SET 就解決了:

init_query = "VALUES (1,2)"

AWS - IAM Role with Policy

AWS 的 IAM Role 跟 Policy 有兩種連接方式:
- Role 內嵌 Policy.
- Role 和 Policy 是各自建立, 然後再接起來(attach)用.

以 Policy 編修來說, 前者就只能在 portal 上面 CRUD, 後者在 Policy 本身的 portal 介面還可以看 permission 檢查, 歷次編修版本與控管, 相同的 Policy 還可以接到多個 Role 共用, 後來我也盡量都用後者.

不過後者在 Terraform 的寫作上有需要注意的地方, 一般寫法如下:

resource "aws_iam_policy" "this" {}
resource "aws_iam_role" "this" {}
resource "aws_iam_role_policy_attachment" "this" {
  depends_on = [
    aws_iam_role.this,
    aws_iam_policy.this
  ]
}

在 terraform apply 的時候不成問題, 但是在 terraform destroy 會發生 race condition: Policy 還沒從 Role 拆出來, 上面這個寫法會造成 aws_iam_policy 跟 aws_iam_role 同時進行 destroy, 在刪除 aws_iam_policy 就會噴錯誤訊息, 說 Policy 還接在 Role 上面所以不能被砍掉.

雖然再執行一次 terraform destroy 就過了(錯誤是在砍 aws_iam_policy 的時候噴的, 但同時砍 aws_iam_role 的動作有被完成), 但是這樣對於砍站跑路就不夠絲滑.

簡單解決的方式就是在 aws_iam_role 裡面加一個 depends_on aws_iam_policy:

resource "aws_iam_role" "this" {
  ...

  depends_on = [
    aws_iam_policy.this
  ]
}

這樣子在 destroy 的時候, aws_iam_role 就會先被刪除(無論 Policy 拆出來了沒), 再刪除 aws_iam_policy 就不會卡住了.

然後第一個方式在 Terraform 有個地雷, 在 Role 裡面內嵌 Policy 大概是這樣寫:

resource "aws_iam_role" "this" {
  ...

  inline_policy {
    name = "Role-foobar-Policy"
    ...
  }
}

當不要用 inline_pocily 的時候, 把這段刪除成這樣:

resource "aws_iam_role" "this" {
  ...
}

然後 terraform apply 的時候, diff 並沒有出現 - 掉 inline_policy 這塊的訊息, 實際上 Terraform 真的沒做這個刪除, 在 portal 是還看得到 inline_policy 的存在, 得在這邊手動砍掉才算沒了.


隱欌地雷: AWS IAM 有好幾個拆連接的動作會產生 race condition, 表面上 API 回應 ok, 但是實際上裡面還在慢慢斷開, 沒那麼快拆完...

2022年11月30日 星期三

GCP - copy IAM custom role R from project A to project B

Role ID: projects/A/roles/R

0. gcloud auth login (with enough permission)

1. gcloud iam roles describe R --project=A > R.txt

2. gcloud iam roles create R --project=B --file=R.txt

2022年5月8日 星期日

random password generator - use jot + rs

適用於 BSD OS 與 Mac 環境

jot -r -c 160 / z | \
  grep -e '[a-z]' -e '[A-Z]' -e '[0-9]' | \
  rs -g0 0 64

以上會產生出 160 個 ascii / 到 z 的字元, 只擷取 a-z A-Z 0-9 來用, 集結成每行長度 64 的字串.

如果要放行一些符號的話, 像是底線(_)也在 / 到 z 的範圍內, 就可以在 grep 指令加上 -e _ 擷取來用.


Ascii table (credit: https://c-for-dummies.com/blog/?p=4895)

2022年4月27日 星期三

Terraform - google_redis_instance with auth_enabled is true

在 google_redis_instance 裡面是這樣寫的:

auth_enabled - (Optional) Optional. Indicates whether OSS Redis AUTH is enabled for the instance.
If set to "true" AUTH is enabled on the instance. Default value is "false" meaning AUTH is disabled.

auth_string - (Optional) AUTH String set on the instance. This field will only be populated if auth_enabled is true.

redis 還是打開 auth 才安全, 所以當然就這樣設定:

resource "google_redis_instance" "this" {
  ...
  auth_enabled = true
  auth_string  = "023dbce5e060641d09218027704ca4b3"
  ...
}

接著 terraform apply 下去打開 auth...

Error: Value for unconfigurable attribute

  with module.redis.module.redis-general.google_redis_instance.this, on modules/redis/main.tf line 24, in resource
  "google_redis_instance" "this":
  24:   auth_string  = "023dbce5e060641d09218027704ca4b3"

Can't configure a value for "auth_string": its value will be decided automatically based on the result of applying
this configuration.

所以是會自動生成的意思? 那拿掉 auth_string 的設定, 先 terraform apply 上去之後, 再 terraform show 出來看 auth_string 的內容...

# module.redis.module.redis-general.google_redis_instance.this:
resource "google_redis_instance" "this" {
    alternative_location_id  = "us-west1-c"
    auth_enabled             = true
    auth_string              = (sensitive value)
    ...

竟然看不到... oroz

查了一下, 得用 terraform show -json 才看得到, 執行下去會得到一行很長很長的 json, 那就多用 jq 轉一下: terraform show -json | jq .

"resources": [
  {
    "address": "module.redis.module.redis-general.google_redis_instance.this",
    "mode": "managed",
    "type": "google_redis_instance",
    "name": "this",
    "provider_name": "registry.terraform.io/hashicorp/google",
    "schema_version": 0,
    "values": {
      "alternative_location_id": "us-west1-c",
      "auth_enabled": true,
      "auth_string": "ded6f8e9-5c32-4ebb-b0fb-086a444baa7f",
      ...
    }
  }

然後在上面這一段終於看到啦~

2022年4月25日 星期一

Terraform - provider google version upgrade

起因是為了 resource google_redis_instance 要用到 replica 的功能...

根據 CHANGELOG 文件, provider google 需用 4.17.0 以上版本. (此時最新版是 v4.18.0)

在 versions.tf 裡面原本是這樣設定一個版本來用:

terraform {
  required_providers {
    google = {
      source  = "hashicorp/google"
      version = "3.58.0"
    }
  }

  required_version = "~> 1.0.0"
}

就把 version 改成 ">= 4.17.0"

順便把 required_version 也升級成 "~> 1.1.0" (此時 homebrew terraform 是 v1.1.9)

terraform {
  required_providers {
    google = {
      source  = "hashicorp/google"
      version = ">= 4.17.0"
    }
  }

  required_version = "~> 1.1.0"
}

一般情況下來說, 這樣改完之後再執行 terraform init -upgrade 就會看到原本裝好的 provider google:

- Using previously-installed hashicorp/google v3.58.0

被更新中...

- Installing hashicorp/google v4.18.0...
- Installed hashicorp/google v4.18.0 (signed by HashiCorp)

之後的 terraform init 動作就看到都是 v4.18.0

- Using previously-installed hashicorp/google v4.18.0

然後因為 provider 跨了大版本, 遇到 state file 格式變動, 還要再執行 terraform refresh 更新一遍.


但是實際上...

Initializing provider plugins...
- Finding hashicorp/google versions matching ">= 2.12.0, >= 3.45.0, < 4.0.0, >= 4.17.0"...

然後 terraform init -upgrade 就抓不到能用的升級版本.

後來發現是在某個 resource 裡面有設定 version = "~> 3.0", 莫名其妙多出上面的 < 4.0.0 的條件卡關. 直接把這個改成 version = "~> 4.0" 跟著升級上去, terraform init -upgrade 版本條件就變成:

Initializing provider plugins...
- Finding hashicorp/google-beta versions matching ">= 3.45.0, < 5.0.0"...

就有抓到可用版本(v4.18.0)升級上去了.

2021年12月2日 星期四

GCP - Cloud CDN for external site

Scenario

https://www.foobar.com - external site, not in Google Cloud.

Requirement

set another hostname for origin server access - for example, web.foobar.com ip = www.foobar.com ip

Steps

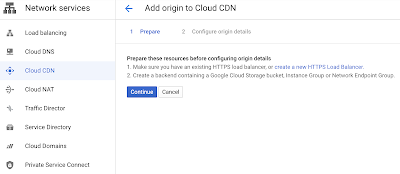
0. In the beginning of Cloud CDN, click "ADD ORIGIN".
1. After reading preparation, and click "Continue".
2. www.foobar.com is an external site, so check "Use an external backend".
3. Click "Load balancer" list, and click "Create a load balancer".
4. In "New Classic HTTP(S) load balancer" form, start at Backend configuration.
5. Click "Backend services & backend buckets" list, and click "CREATE A BACKEND SERVICE".
6. In "Create backend service" form, basic area.
7. In "Create backend service" form, "Backends" area.
8. In "Create backend service" form, "Cloud CDN" area.
9. In basic area, input "Name" and "Description", "Backend type" select "Internet network endpoint group / External backends".
10. After selecting "Backend type", "Protocol" select "HTTPS".
11. In "Backends" area, click "Internet network endpoint group" list, and click "CREATE INTERNET NETWORK ENDPOINT GROUP".
12. In "Create a network endpoint group" form.
13. Input "Name", "Network endpoint group type" select "Network endpoint group (Internet)", "Default port" input "443", "Fully qualified domain name" input "web.foobar.com", and click "Create".
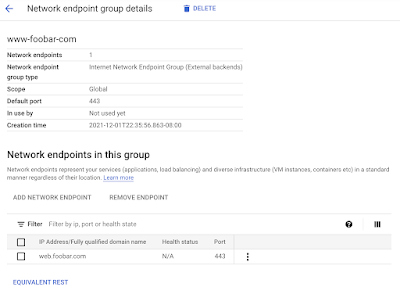
14. After clicking "Create", "www-foobar-com" in the Network endpoint group list.
15. "Network endpoint group details" of "www-foobar-com".
16. Back to the "Backends" area, input "foobar" at "Filter" and shows "www-foobar-com", click it.
17. After clicking "www-foobar-com", it showed at "Internet network endpoint group".
18. In "Cloud CDN" form, check "Enable Cloud CDN" and change default settings, then click "CREATE".
19. After creating "Backend configuration" successful, back to "New Classic HTTP(S) load balancer" form. Check "www-foobar-com" in "Backend services & backend buckets" list, then click "OK".

20. After clicking "OK", "www-foobar-com" is listed below.
21. Skip "Host and path rules" form, because of using CDN to cache whole site.
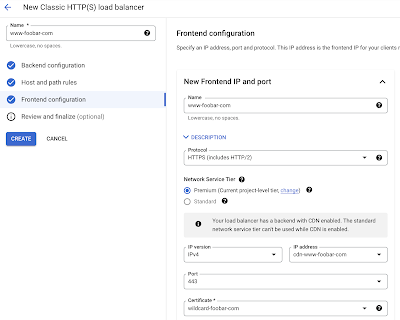
22. In "New Classic HTTP(S) load balancer" form, "Frontend configuration" area.
23. Input "Name", "Protocol" select "HTTPS (include HTTP/2)", shows "Certificate" list below, cilck "CREATE A NEW CERTIFICATE".
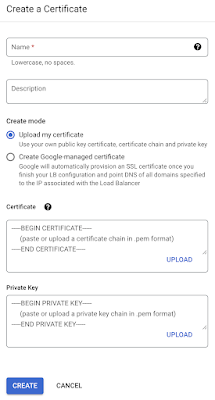
24. In "Create a Certificate" form.
25. Input "Name", check "Create Google-managed certificate", input "Domains" then click "CREATE".
26. Back to "Frontend configuration" form. Click "IP address" list, and click "CREATE IP ADDRESS”.
27. In "Reserved a new static IP address" form. Input "Name", and click "RESERVE".
28. Back to "Frontend configuration" form.
29. In the bottom of "Frontend configuration" form, click "ADDITIONAL CERTIFICATES" to expand form. Check "Enable HTTP to HTTPS redirect”, and click “DONE”.
30. Complete "Frontend configuration" form.
31. Click "Review and finalize" to confirm, and click “CREATE”.
32. There are two new load balancers. "HTTPS" is for supporting service, and "HTTP" is for redirecting connections to "HTTPS".
33. Reload "Cloud CDN", there is a new CDN listed. Click "www-foobar-com" under "Associated load balancers".
34. IP:Port of www-foobar-com is detailed. Set this IP address to www.foobar.com in DNS service.

Remove CDN settings: 1. Network services - Cloud CDN 2. Network services - Load balancing (remove with backend and certification) 3. VPC Network - IP addresses

2021年11月18日 星期四

Monitoring - use Pingdom and beginning

外部監控網站服務


Web: https://www.pingdom.com/
Pricing: https://www.pingdom.com/pricing/

主要價差是用在 SMS 手機簡訊通知數量, 其次是監控的網址數量


Setup FREE TRIAL (1 month)

Settings > General
  • Set Organization Details


Login: https://my.pingdom.com/

Invite User
  • Email
  • Organization Role as Member, Admin, or Owner
  • Product Roles(s)
    • Pingdom as Viewer, Editor, Admin or Owner

Add New Uptime Check (for example: https://www.foobar.com/health )
  • https://my.pingdom.com/app/newchecks/checks
  • Name of check: Foobar Web (Azure)
  • Check interval: 1 minute (default)
  • Check type: HTTP(S) (default)
  • URL/IP: [ https:// ] [ www.foobar.com/health ]
  • Test from: Asia Pacific (看主要用戶來源地區是哪邊而定)
  • Tags: (把這個網址會路過的服務都輸入, 像是 azure trafficmanager cloudapp 三個 tag)
  •  
  • Check importance: High Importance (default)
  • Who to alert? (通常是 SRE 都勾, 然後在 Settings > Profile 有輸入手機號碼(前面不用 0)才會收到 SMS 簡訊通知, 當然還要付完錢)
  • When down, alert after: 3 minutes (default 5 minutes)

2021年10月20日 星期三

Terraform - Optional !?

terraform 你他媽的 Optional...

The following arguments are supported:

project - (Optional) The ID of the project in which the resource belongs.
If it is not provided, the project will be parsed from the identifier of the parent resource. If no project is provided
in the parent identifier and no project is specified, the provider project is used.

然後真的塞 project 進去, 就噴:

Error: Unsupported argument

An argument named "project" is not expected here.

2021年10月18日 星期一

Terraform - googleapi: Error 409: The Cloud SQL instance already exists

今天改了 db 的 resource dependency 要整個砍掉重練看看是不是一鍵順暢建庫成功, 所以先跑了 terraform destroy (要先關掉 db instance 的 deletion protection)再跑 terraform apply 開始蓋, 結果...

googleapi: Error 409: The Cloud SQL instance already exists.

When you delete an instance, you can't reuse the name of the deleted instance until one week from the deletion date.,
instanceAlreadyExists

我以為這種鳥蛋限制只會在 Azure 上面出現.... <囧>

這年頭連 GCP 都要做誤刪資料庫甚至刪庫跑路的災難回復服務了?

這還不是最鳥的問題, 而是用 terraform apply 進行 create sql instance 等了超過 20 分鐘, 才噴這個訊息出來, 這種 instance name check 應該放在最前面檢查吧....!@#$

2021年10月4日 星期一

Terraform - the only supported value for workload pool is ...

昨天 terraform 能正常跑完, 今天換了個 project 卻噴出這個訊息:

Error: googleapi: Error 400: Currently, the only supported value for workload pool is "foobar.svc.id.goog"., badRequest

terraform 這塊的設定檔也沒改, 是怎麼噴掉的?

打開 TF_LOG 開始追 API query 看了老半天, 覺得沒有問題啊, 再仔細看看... 嗯?

"workloadIdentityConfig": {
  "identityNamespace": " foobar.svc.id.goog"
}

怎麼 foobar 前面有個疑似空白的東西, 回去翻 terraform 設定.

這邊是抓 google_project.data.name 來用, 再切到 GCP portal IAM 看看...

Permissions for project " foobar"

project name 還真的前面有個空白存在... <囧>

後來在 console 的 IAM -> Settings 把 Project name 前面的空白拿掉, 存檔, 再跑一次 terraform 就正常了.

2021年9月22日 星期三

Terraform - will be read during apply ?

有時候會在 terraform plan / apply 的時候看到這種恐怖的情況...

  # module.foobar.data.google_service_account.this will be read during apply
  # (config refers to values not yet known)
  ...
  # module.foobar.google_pubsub_subscription.this must be replaced
  ...
  # module.foobar.google_pubsub_topic.this must be replaced
  ...
  # module.foobar.google_storage_bucket.this will be destroyed
  ...
  # module.foobar.google_storage_bucket_iam_member.bucket will be destroyed
  ...
  # module.foobar.google_storage_bucket_iam_member.object will be destroyed
  ...
  # module.foobar.google_pubsub_subscription_iam_member.this will be updated in-place
  ...

在同一個層級(module.foobar), 只要有一個 data object 需要被重讀(will be read during apply)更新內容的話, 後面同級的 resource 幾乎都會被當作受到影響, 而被 terraform 進行取代(replaced)或是砍掉(destroyed)的處置, 要是這些 resource 是 pubsub topic / cloud storage bucket 這類會存資料的地方, 那就會掉資料甚至全滅.

如果直接 terraform apply -target='module.foobar' 執行更新下去, 那通常會很慘, 因為 terraform apply 列出來這些就是這次安排執行的處置, 就算 module.foobar.data.google_service_account.this 執行重讀之後內容還是一樣, 後續的取代或砍掉的處置照樣會執行, 造成誤砍誤殺的結果.

正確的手動解法, 是執行 terraform apply -target='module.foobar.data.google_service_account.this' 先把 data read 的動作獨自執行完成, 若是 data read 回來的內容不變, 那再執行 terraform plan / apply 就不會出現後續的取代或砍掉的處置. 若是內容有變, 顯示出來的可能就只是 object 裡面部分更新(will be updated in-place)的處置, 影響太大的才會被取代或是砍掉.

至於為什麼會出現需要重讀的情況, 大都是因為線上環境的設定跟 terraform 的設定不一致, 或是 gke 被更新版本導致 resource 被異動, 或者可能是 data.google_service_account.this 資料過期了, 所以需要先更新資料.

2021年6月21日 星期一

Terraform - GCP IAM apply / destroy race condition

這是一個用 terraform 處理 GCP project / pubsub subscription / pubsub topic / storage bucket / etc 的 IAM role 常會遇到的 race condition, 目前高達八成確定原因是在 GCP 的相關 API 不是 single action, 而是 atomic action, 而且設後不理沒確認是否執行完成就直接 return.

目前只能用 workaround 解法: 再執行/多執行幾次 terraform 指令. (原因後敘)

假設狀況如下: (真實狀況可能不是/不只這樣)
- bucket foobar 原本就有 role: roles/storage.legacyBucketReader
- 現在要改成 role: roles/storage.legacyBucketOwner
- 執行 terraform apply (無關的部分就省略了):
Terraform used the selected providers to generate the following execution plan. Resource actions are indicated with the following symbols: -/+ destroy and then create replacement Terraform will perform the following actions: # module.basement.google_storage_bucket_iam_member.bucket must be replaced -/+ resource "google_storage_bucket_iam_member" "bucket" { ~ role = "roles/storage.legacyBucketReader" -> "roles/storage.legacyBucketOwner" # forces replacement } Plan: 1 to add, 0 to change, 1 to destroy. Do you want to perform these actions? Terraform will perform the actions described above. Only 'yes' will be accepted to approve. Enter a value:
表示這個 bucket 的 iam role 會被先拆後建. - 輸入 yes 再按 enter 下去之後, 噴錯誤訊息出來說無法設定之類的.... (省略) - 通常只要再執行一次 terraform apply 再 yes 下去之後就可以正常執行完. - 還是噴一樣錯誤訊息的話, 那就再等一下再執行一次... - The End.

有人會問, 是不是可以用 time_sleep 的寫法讓 destroy 先執行完再 apply ?

首先, 這是一個 resource 被 replace (destroy -> apply) 的動作, 並不是分開的 resource 運作, 所以不適用上面這種方式來處理.

其次, 在 terraform 裡面這應該是個呼叫 GCP API 進行 remove 之後再 add 的行為, 中間沒有也不應該有 delay 動作影響執行效率(這也可能產生別的 race condition), 問題點是在 remove 跟 add 大概是 atomic action, 沒有全部確定執行完就 return 回來, 產生後續的 race condition 問題.

最後, 利用 time_sleep 那個寫法實在是累贅也有問題, 因為使用者通常不會知道 create 要花多久時間(create_duration), 也不會知道 destroy_duration 多久, 只能用預估或是猜的來設定. 若是 GCP 不忙的時候可能 1s 就全部跑完, 卻還要等完剩下的 29s, 或是 1m 才跑完, 設定 30s 照樣還是發生 race condition.

倒不如還是人工 delay 再人工執行同樣的 terraform 指令還比較簡單實用.

2021年5月31日 星期一

GCP - Basic.Owner is not full Owner of project

一般來說, GCP project 使用者最大的權限應該是 Basic.Owner, 幾乎所有情況都能通行無阻.

但是...

最好再加上一個 Storage Admin 的 Owner, 才不會在 Cloud Storage 之類的相關功能遇到莫名其妙的卡住. 尤其是有用 terraform 操控 bucket + iam 的時候...

如果 project 上面還有一層 organization, 最好也設定個 Organization 的 Owner 上身, 避免靈異現象...