Role ID: projects/A/roles/R

0. gcloud auth login (with enough permission)

1. gcloud iam roles describe R --project=A > R.txt

2. gcloud iam roles create R --project=B --file=R.txt
2022年11月30日 星期三
GCP - copy IAM custom role R from project A to project B
2022年5月8日 星期日
random password generator - use jot + rs
適用於 BSD OS 與 Mac 環境

jot -r -c 160 / z | \
  grep -e '[a-z]' -e '[A-Z]' -e '[0-9]' | \
  rs -g0 0 64

以上會產生出 160 個 ascii / 到 z 的字元, 只擷取 a-z A-Z 0-9 來用, 集結成每行長度 64 的字串.

如果要放行一些符號的話, 像是底線(_)也在 / 到 z 的範圍內, 就可以在 grep 指令加上 -e _ 擷取來用.


Ascii table (credit: https://c-for-dummies.com/blog/?p=4895)

2022年4月27日 星期三
Terraform - google_redis_instance with auth_enabled is true
在 google_redis_instance | Resources | hashicorp/google | Terraform Registry 裡面是這樣寫的:auth_enabled - (Optional) Optional. Indicates whether OSS Redis AUTH is enabled for the instance. If set to "true" AUTH is enabled on the instance. Default value is "false" meaning AUTH is disabled. auth_string - (Optional) AUTH String set on the instance. This field will only be populated if auth_enabled is true.redis 還是打開 auth 才安全, 所以當然就這樣設定:
resource "google_redis_instance" "this" { ... auth_enabled = true auth_string = "023dbce5e060641d09218027704ca4b3" ... }接著 terraform apply 下去打開 auth...Error: Value for unconfigurable attribute with module.redis.module.redis-general.google_redis_instance.this, on modules/redis/main.tf line 24, in resource "google_redis_instance" "this": 24: auth_string = "023dbce5e060641d09218027704ca4b3" Can't configure a value for "auth_string": its value will be decided automatically based on the result of applying this configuration.所以是會自動生成的意思? 那拿掉 auth_string 的設定, 先 terraform apply 上去之後, 再 terraform show 出來看 auth_string 的內容...# module.redis.module.redis-general.google_redis_instance.this: resource "google_redis_instance" "this" { alternative_location_id = "us-west1-c" auth_enabled = true auth_string = (sensitive value) ...竟然看不到... oroz 查了一下, 得用 terraform show -json 才看得到, 執行下去會得到一行很長很長的 json, 那就多用 jq 轉一下: terraform show -json | jq ."resources": [ { "address": "module.redis.module.redis-general.google_redis_instance.this", "mode": "managed", "type": "google_redis_instance", "name": "this", "provider_name": "registry.terraform.io/hashicorp/google", "schema_version": 0, "values": { "alternative_location_id": "us-west1-c", "auth_enabled": true, "auth_string": "ded6f8e9-5c32-4ebb-b0fb-086a444baa7f", ...終於看到啦~
2022年4月25日 星期一
Terraform - provider google version upgrade
起因是為了 resource google_redis_instance 要用到 replica 的功能... 根據 CHANGELOG 文件, provider google 需用 4.17.0 以上版本. (此時最新版是 v4.18.0) 在 versions.tf 裡面原本是這樣設定一個版本來用:terraform { required_providers { google = { source = "hashicorp/google" version = "3.58.0" } } required_version = "~> 1.0.0" }就把 version 改成 ">= 4.17.0" 順便把 required_version 也升級成 "~> 1.1.0" (此時 homebrew terraform 是 v1.1.9)terraform { required_providers { google = { source = "hashicorp/google" version = ">= 4.17.0" } } required_version = "~> 1.1.0" }-- 一般情況下來說, 這樣改完之後再執行 terraform init -upgrade 就會看到原本裝好的 provider google:- Using previously-installed hashicorp/google v3.58.0被更新中...- Installing hashicorp/google v4.18.0... - Installed hashicorp/google v4.18.0 (signed by HashiCorp)之後的 terraform init 動作就看到都是 v4.18.0- Using previously-installed hashicorp/google v4.18.0然後因為 provider 跨了大版本, 遇到 state file 格式變動, 還要再執行 terraform refresh 更新一遍. -- 但是實際上...Initializing provider plugins... - Finding hashicorp/google versions matching ">= 2.12.0, >= 3.45.0, < 4.0.0, >= 4.17.0"...然後 terraform init -upgrade 就抓不到能用的升級版本. 後來發現是在某個 resource 裡面有設定 version = "~> 3.0", 莫名其妙多出上面的 < 4.0.0 的條件卡關. 直接把這個改成 version = "~> 4.0" 跟著升級上去, terraform init -upgrade 版本條件就變成:Initializing provider plugins... - Finding hashicorp/google-beta versions matching ">= 3.45.0, < 5.0.0"...就有抓到可用版本(v4.18.0)升級上去了.
2021年12月2日 星期四
GCP - Cloud CDN for external site
Scenario
https://www.foobar.com - external site, not in Google Cloud.Requirement
set another hostname for origin server access - for example, web.foobar.com ip = www.foobar.com ipSteps
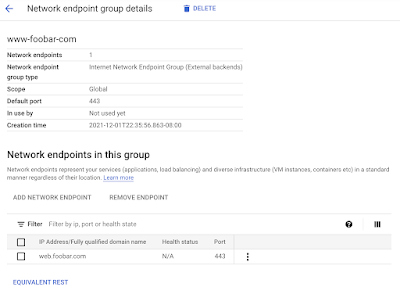
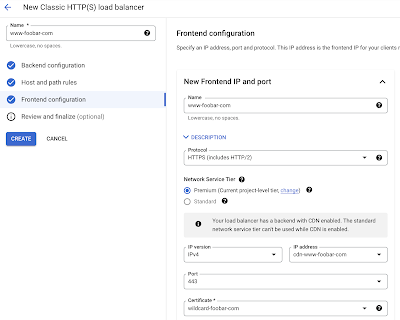
0. In the beginning of Cloud CDN, click "ADD ORIGIN".1. After reading preparation, and click "Continue".2. www.foobar.com is an external site, so check "Use an external backend".3. Click "Load balancer" list, and click "Create a load balancer".4. In "New Classic HTTP(S) load balancer" form, start at Backend configuration.5. Click "Backend services & backend buckets" list, and click "CREATE A BACKEND SERVICE".6. In "Create backend service" form, basic area.7. In "Create backend service" form, "Backends" area.8. In "Create backend service" form, "Cloud CDN" area.9. In basic area, input "Name" and "Description", "Backend type" select "Internet network endpoint group / External backends".10. After selecting "Backend type", "Protocol" select "HTTPS".11. In "Backends" area, click "Internet network endpoint group" list, and click "CREATE INTERNET NETWORK ENDPOINT GROUP".12. In "Create a network endpoint group" form.13. Input "Name", "Network endpoint group type" select "Network endpoint group (Internet)", "Default port" input "443", "Fully qualified domain name" input "web.foobar.com", and click "Create".14. After clicking "Create", "www-foobar-com" in the Network endpoint group list.15. "Network endpoint group details" of "www-foobar-com".16. Back to the "Backends" area, input "foobar" at "Filter" and shows "www-foobar-com", click it.17. After clicking "www-foobar-com", it showed at "Internet network endpoint group".18. In "Cloud CDN" form, check "Enable Cloud CDN" and change default settings, then click "CREATE".19. After creating "Backend configuration" successful, back to "New Classic HTTP(S) load balancer" form. Check "www-foobar-com" in "Backend services & backend buckets" list, then click "OK".
20. After clicking "OK", "www-foobar-com" is listed below.21. Skip "Host and path rules" form, because of using CDN to cache whole site.22. In "New Classic HTTP(S) load balancer" form, "Frontend configuration" area.23. Input "Name", "Protocol" select "HTTPS (include HTTP/2)", shows "Certificate" list below, cilck "CREATE A NEW CERTIFICATE".24. In "Create a Certificate" form.25. Input "Name", check "Create Google-managed certificate", input "Domains" then click "CREATE".26. Back to "Frontend configuration" form. Click "IP address" list, and click "CREATE IP ADDRESS”.27. In "Reserved a new static IP address" form. Input "Name", and click "RESERVE".28. Back to "Frontend configuration" form.29. In the bottom of "Frontend configuration" form, click "ADDITIONAL CERTIFICATES" to expand form. Check "Enable HTTP to HTTPS redirect”, and click “DONE”.30. Complete "Frontend configuration" form.31. Click "Review and finalize" to confirm, and click “CREATE”.32. There are two new load balancers. "HTTPS" is for supporting service, and "HTTP" is for redirecting connections to "HTTPS".33. Reload "Cloud CDN", there is a new CDN listed. Click "www-foobar-com" under "Associated load balancers".34. IP:Port of www-foobar-com is detailed. Set this IP address to www.foobar.com in DNS service.
Remove CDN settings: 1. Network services - Cloud CDN 2. Network services - Load balancing (remove with backend and certification) 3. VPC Network - IP addresses


2021年11月18日 星期四
Monitoring - use Pingdom and beginning
外部監控網站服務
Web: https://www.pingdom.com/
Pricing: https://www.pingdom.com/pricing/
主要價差是用在 SMS 手機簡訊通知數量, 其次是監控的網址數量
Setup FREE TRIAL (1 month)
Settings > General
Login: https://my.pingdom.com/
Invite User
Add New Uptime Check (for example: https://www.foobar.com/health )
Web: https://www.pingdom.com/
Pricing: https://www.pingdom.com/pricing/
主要價差是用在 SMS 手機簡訊通知數量, 其次是監控的網址數量
Setup FREE TRIAL (1 month)
- https://www.pingdom.com/sign-up/
- Use Synthetic Monitoring - 10 Uptime, 1 Advanced, 50 SMS
- No Real User Monitoring
- regist your email as owner account
Settings > General
- Set Organization Details
Login: https://my.pingdom.com/
Invite User
- Organization Role as Member, Admin, or Owner
- Product Roles(s)
- Pingdom as Viewer, Editor, Admin or Owner
Add New Uptime Check (for example: https://www.foobar.com/health )
- https://my.pingdom.com/app/newchecks/checks
- Name of check: Foobar Web (Azure)
- Check interval: 1 minute (default)
- Check type: HTTP(S) (default)
- URL/IP: [ https:// ] [ www.foobar.com/health ]
- Test from: Asia Pacific (看主要用戶來源地區是哪邊而定)
- Tags: (把這個網址會路過的服務都輸入, 像是 azure trafficmanager cloudapp 三個 tag)
- Check importance: High Importance (default)
- Who to alert? (通常是 SRE 都勾, 然後在 Settings > Profile 有輸入手機號碼(前面不用 0)才會收到 SMS 簡訊通知, 當然還要付完錢)
- When down, alert after: 3 minutes (default 5 minutes)
2021年10月20日 星期三
Terraform - Optional !?
terraform 你他媽的 Optional...
然後真的塞 project 進去, 就噴:
  The following arguments are supported:

  project - (Optional) The ID of the project in which the resource belongs.
  If it is not provided, the project will be parsed from the identifier of
  the parent resource. If no project is provided in the parent identifier
  and no project is specified, the provider project is used.
然後真的塞 project 進去, 就噴:
  Error: Unsupported argument
  An argument named "project" is not expected here.
訂閱:
文章 (Atom)